Piano Blog by Skoove – Piano Practice Tips
Finger positions are the key to learning to play the piano quickly and well. They allow you to learn difficult music quickly, avoid injury, and master playing fast and at tempos and key signatures that you could never imagine before. Here we cover many techniques to learn piano positions, and apply them to your own playing so you can be better than ever before.
Key Takeaways
Finger positions are labeled using five numbers, for your five fingers
Some finger positions will be easier than others, depending on the key
Many positions are named based on the lowest note your hand can play
Key signatures are not always the same as finger position
Right and left hands both use finger positions
Finger positions are very important for learning piano
Why do you need good piano fingering?
All basic finger patterns are based on the same ideas when you’re playing piano. In order to play piano the best that you can, you need good piano posture, and to slow down your playing, and focus on where you place your fingers on the piano, or where your hands fall on the keyboard. Good finger position will allow the right fingers to fall in place on the keys, so that when you’re playing music, you will not need to move your right or left hand out to the left or right.
Be careful, because the fingering from the left hand and the right hand do not use the same fingers, because the correct fingers are actually inverted, meaning that the piano finger numbers and piano techniques are opposite for the right hand and the left hand. Most piano sheet music will indicate which fingers to use, and the hand position will be dictated by this. Often playing piano and hand position will be written by the composer, so that you don’t need to think about having good piano technique. Don’t be afraid to ask what piano fingers are, because they will lead to your playing well, and efficiently.
How to use finger numbers and finger positions
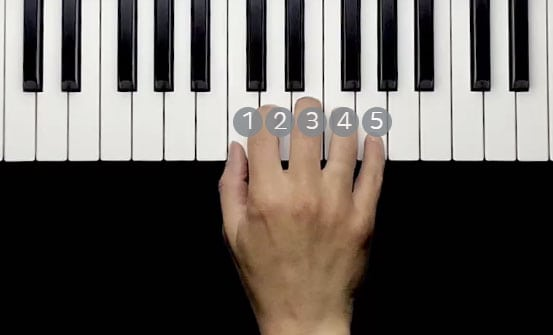
The image below shows that on the right hand the finger numbers start at our thumb. Our fingers are numbered one through five. This is the universal language all musicians use to show correct piano fingers in their songs. You can also practice piano finger exercise, just look at the bottom of the article. One is always referring to the thumb of the right hand, two is always referring to the ring fingers of the right hand, and so on. Finger numbers are opposite for the left hand, because our hands are mirror images of each other.
In the image the pianist is playing the beginning of the C major scale, with the right hand thumb resting simply on the middle C. A common rule is that no thumbs are on black keys when playing scales, if you can help it. However, this will sometimes be broken. A composer will write an instruction and the most important thing for you to remember, is that you follow the fingering as written. Don’t be afraid to write in your own finger numbers on a black key, if you need to. Every piano player learns how to place fingers on the piano.
Four piano finger exercises for beginners
Piano fingering exercises are an incredible way to learn about how to use your fingers when playing the instrument. Many will start on middle C, some will focus on scalar passages or contrary motion (working in opposite directions), some will focus on chords – just follow the general guidelines of which fingers to use. There are so many things to practice. Practicing finger exercises is one of the key building blocks for you as a beginner. Practice slowly, and focus on the change of hand position. Warm-up exercises for piano are very important to learning to play well, here are some great examples.
Piano finger exercise #1: Stevie Wonder’s, “You are the sunshine of my Life”
Here are the first four bars from “You are the Sunshine of my Life”. The first step when assigning fingers to keys is to look for the highest and lowest notes within the melody. Pay attention to the melody in music. Get into a five finger position and place our thumb on G and our fifth finger on D, and our three middle fingers on piano, the piano notes in between. All the keys we need are at our fingertips. If you’re having trouble, you can always label piano keys.
Piano finger exercise #2: House of the Rising Sun
In this example, “House of the Rising Sun”, our left hand starts in a five finger position with our thumb on E in the bass clef . In the fourth bar however, we need to change position. We move our left thumb pinky finger to the new note, and play the broken chords arpeggio C. Our finger position has made this exercise very simple, and easy.
Piano finger exercise #3: Copacabana
This example exercises the hardest part of learning to play piano, the thumb under technique. The right hand thumb sneaks under the index finger as the scale climbs. We cannot play the entire melody without moving out of the five finger position. The fingering is the same for most of our piano scales.
Piano finger exercise #4: White keys
In this next example, we have the first four bars from “White Keys” by Chilli Gonzalez. To play this melody correctly, we’re going to cover the first five notes with our hand in a five finger position, starting with our fifth finger on C. When we reach our thumb, the middle finger then leaps over the thumb, and then we continue with the same fingering. To play bars three to four, just use the same finger over technique as we did in bars one to two.
Piano finger exercise #5: Contrary Motion
This is an excellent exercise for working on fingerings for piano. The piano finger numbers for each hand are mirrored, so that means that when the notes play opposite music, the fingerings are the same. This sounds complex, but it is not. Whenever you are playing scales with two hands – you can play them moving apart from one another and the fingering is the exact same in both hands. Look at the sheet music, and notice that both hands start and end on the exact same pitch, thumbs together.
Final words of advice
The best thing about learning to rely on your piano fingerings is that you will realize that playing piano is much simpler than you might imagine. Writing down the fingerings you need is the most important part of playing, because you cannot always rely on your muscle memory. Especially when you play for many years, when you revisit an old piece, you will have forgotten the complex dance of fingerings that allowed you to play it perfectly, or avoid complex combinations of black keys, but if you take good notes you will avoid this. Skoove is the best place to go for personalized online piano lessons, like having your own piano teacher giving you private piano lessons. Always try and use correct fingering, and you will see yourself improve, but Skoove shows you the right way to play everything on the app.
Author of this blog post:
Read More
This article is from an external source and may contain external links not controlled by Empeda Music.