

GUITARHABITS
Last Updated on September 25, 2020 by Klaus Crow

When you learn your first scales you usually start with two-octave scales, because they span all six strings of the guitar. You play from the Low E-string all the way up to the high e-string.
That’s great! It’s important you learn the two-octave scales inside out, but one-octave scales have their own effective purpose that will serve your playing in a different and complementary way.
Why You Want to Learn One Octave Scales
One of the reasons you want to learn one-octave scales is because of their simplicity. By using only one octave it’s easier to see the shape and structure of the scale, the notes within the scale, and the intervals. The scale is more user-friendly, easier to play, memorize and apply around the fretboard.
There’s another great benefit to learning one-octave scales. Once you got them under your fingers it’s only a matter of connecting the dots to lay out two octave and three-octave scales, since they are made up of one-octave scales.
Note: This post is part of a small series where you will learn one-octave major scale shapes across the entire guitar neck that will help you understand and own the major scale landscape.
Starting from the Root Note on the Low E-string
Today we’re learning three major scale shape/patterns with the first (root) note starting on the Low E-string (6th string).
Tip: For this lesson learn and memorize the notes on the low E-string so you know and recognize the key of the scale when you want to move the scale up or down the fretboard.
Major Scale Fingering
For the major scale examples and tablature below I’ve notated the left hand fingering (for right handed players). The numbers next to the notes on the note staff right above the tablature indicates the left hand fingers:
1 = index
2 = middle finger
3 = ring finger
4 = pinky
The numbers in the yellow neck diagrams also indicate the fingers. The neck diagrams also clearly show what the shape or pattern looks like. Learn to visualize and memorize the shape of each pattern.
Alternative Picking
Make sure you play the scale shapes using alternative picking. Hold the pick between your thumb and index finger with the pointed end facing toward the strings. Strictly use alternating down and up strokes. The first note you play is a downstroke, the second an upstroke, the third one a downstroke, the fourth one an upstroke and so on.
Key of the Scale
In the examples below we play the G major scale, but it’s the goal to learn these scale shapes/patterns in every key.
Now let’s get to practice!
MAJOR SCALE SHAPES – ROOT NOTE STARTS FROM THE 6TH STRING
G MAJOR SCALE SHAPE / PATTERN #1
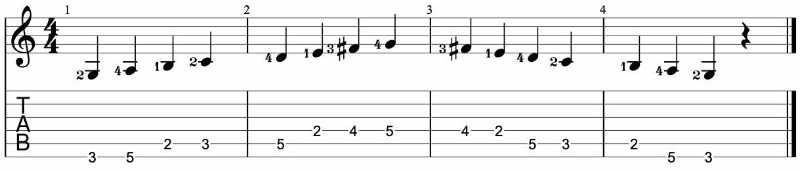

First learn and memorize major scale pattern #1. Once you got the scale under your fingers learn the pattern in different keys. Move up the entire scale shape 2 frets higher (that means every note of the scale) and play it again. Your first (root) note should now be starting on the 5th fret Low E-string. You are now playing an A major scale. Now play the scale starting with the first note on the 8th fret. You’re playing a C major scale. Learn the skill of playing your scale everywhere on the neck.
G MAJOR SCALE SHAPE / PATTERN #2
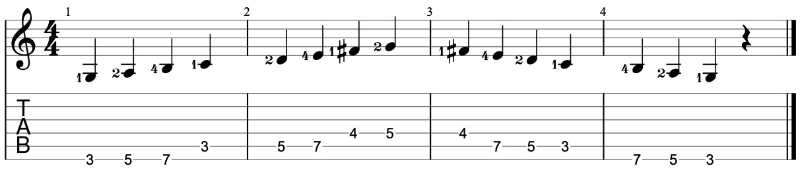

Major scale pattern #2 needs a little bit of a stretch which might seem challenging in the beginning, but after some practice you will get the hang of it. This one is really good for cultivating dexterity, and playing 3-notes-per string licks. Again, once you got it under your fingers learn to play this pattern in different keys. When you play this scale pattern higher up the neck it gets the easier, because the spaces between the frets get smaller.
G MAJOR SCALE SHAPE / PATTERN #3
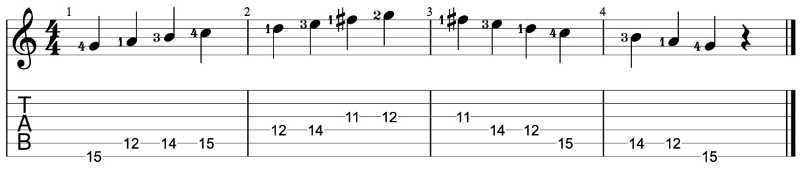

Pattern #3 seems a little bit far up the neck, but the point is to learn and memorize the scale shape/pattern and then play it in different keys around the neck. Example: Play this scale moving down 10 frets, starting with the first (root) note on the 5th fret Low E-string you are playing an A major scale. Now play it on the 8th fret, the 10th fret, 7th fret and 10th fret. This is a great exercise to get comfortable with the entire fretboard and learning to play in different keys and feel free in your playing.
Assignments:
- Learn to play each scale shape /pattern ascending and descending using alternate picking.
- Make sure each notes sound clean and clear.
- Learn to play the scale shapes in different keys and be sure to know what key you’re playing in.
- Play the scale along with a metronome in different tempos.
- Try to create some melody with each scale shape. Experiment with playing notes from the scale in a different order, use rhythm and different note lengths, and pauses. Try to come up with your own melody or play an existing melody you already know. Play around with the notes. It’s such a valuable lesson. Dare to experiment!
Have fun!
P.S.
In the upcoming post we’re going to learn one-octave scales starting on the A-string. We’re going to master the entire fingerboard. Don’t miss it. Stay tuned!
Read More
This article is from an external source and may contain external links not controlled by Empeda Music.