

GUITARHABITS
Last Updated on May 21, 2021 by Klaus Crow
Welcome you diligent guitar student. You have arrived at Part IV of the “One-Octave Natural Minor Scales” Series. The final lesson of these series to practice, play and put it all together. Let’s get your hands dirty!
If you are a first timer in these series start from the beginning and check out:
Powerful One-Octave Natural Minor Scales – Part I
Powerful One-Octave Natural Minor Scales – Part II
Powerful One-Octave Natural Minor Scales – Part III
In Part IV we’re going up the strings again and start with the root note from the G-string (3rd string) all the way up to the high e-string (1st string). We have 3 different scale patterns to learn, all containing the same notes of the natural minor scale.
Why Learn One-Octave Natural Minor Scales?
Learning one-octave natural minor scales will make you see and understand the overal picture of the scale in a clearer way. You can easily recognize the shape, the structure, the notes and the intervals of the scale, also how to practice and put it in action, since it’s only one octave. The scale is as important for beginners as it is for intermediate guitar players. Both will benefit from these scale tremendously.
If you found yourself in this lesson but you’re looking to learn the two-octave natural minor scales, or you want a follow up for the “One-octave Natural Minor Scales Series” check out: Exploring the Natural Minor Scale and The 5 natural minor scale positions you must know. If you stay with this lesson, focus and dominate!
Left and Right Hand Playing
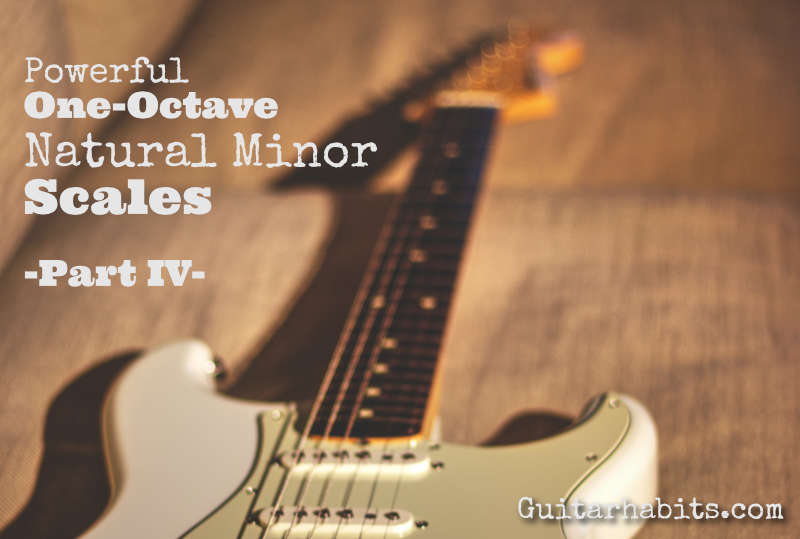
You can read the one-octave minor scale patterns in the tablature below.
In the yellow diagrams you can see the left hand fingering (right hand players) for each scale shape / pattern. The numbers in the dots indicate the fingers. The red notes are the root notes.
| 1 = index | 2 = middle finger | 3 = ring finger | 4 = pinky |
Try to visualize the shape of each scale pattern. See the form of the scale and how the notes are placed on the strings in your mind’s eye. When you have the scale shape clear in your mind it’s easier to memorize and play it.
With your picking hand play the scale using alternate picking (down-up-down-up-down-up, etc.).
Learn the scale patterns in all keys
The natural minor scales in these series are playing in the key of A, but you want to learn to play them in every key possible. This is how you become an accomplished guitar player.
Learn one scale pattern thoroughly and then move it up and down the neck to play it in different keys. Check out Part I to learn how to play the shapes in different keys around the neck.
Some scale patterns also become easier to play when you play them in a different key. Pattern #11 might be more comfortable to play when you change keys and move it higher up the neck, while pattern #12 might be easier on your hands when you move it down a few steps. Make it a routine to practice the scales anywhere on the neck.
Enjoy a wonderful practice!
A NATURAL MINOR SCALE – Shape / Pattern #10
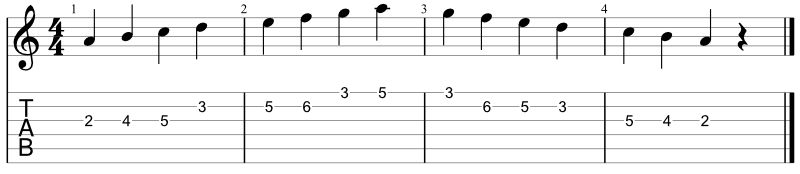

A NATURAL MINOR SCALE – Shape / Pattern #11
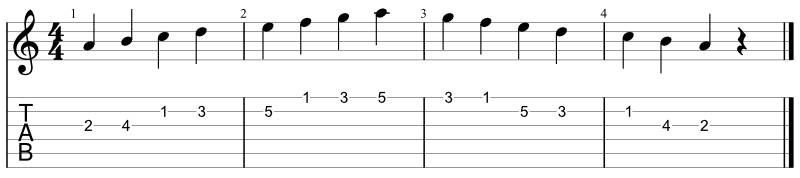

A NATURAL MINOR SCALE – Shape / Pattern #12

Scale pattern assignments:
- Learn and memorize each scale shape pattern thoroughly using alternate picking.
- Learn all the notes on the G-string.
- Play the shapes in random keys. Speak out the name of the key you’re playing in.
- Re-practice the one-octave Natural Minor scale patterns of Part I, II and III and IV.
- Exercise: Practice the scale shapes from the complete series in the key of A, then F, C and finally G.
- Try to create some melody with the new learned scale patterns.
- Now try to play some melody over a Jam track A minor Rock Backing track
Read More
This article is from an external source and may contain external links not controlled by Empeda Music.