
GUITARHABITS
Last Updated on April 15, 2021 by Klaus Crow
Today we are going to learn how to play one-octave Natural Minor scales. There are also the more common Two-octave natural minor scales, but in this guitar lesson I’m going to teach you HOW and WHY the one-octave Natural Minor scales are just as important.
Why You Want to Learn One Octave Natural Minor Scales
The one-octave scales are the smaller components of the two-octave scales. Their compact structure and shape makes them easier to play, memorize and comprehend.
Once you get them under your fingers you can combine the patterns to create the two octave and three-octave scales and other wild variations.
Moreover the natural minor scale is the perfect scale to combine with the minor pentatonic / blues scale to add some melodic flavor to your blues and rock soloing.
And last but not least, they give you a better insight in how those scales are constructed and how to easily move them all across the fretboard.
Note: This post is part of a free series where you will learn one-octave natural minor scale shapes across the entire guitar neck that will help you understand and own the natural minor scale landscape.
If you prefer the one-octave “Major Scale” series you can check it out here: Effective One-Octave Major Scales and Why!
Starting from the Root Note on the Low E-string
Today we’re start learning three natural minor scale shape/patterns with the first (root)note starting on the Low E-string (6th string).
Tip: For this lesson learn and memorize the notes on the low E-string to recognize the notes the key of the scale when you want to move the scale up or down the fretboard.
Natural Minor Scale Shape Fingering
I’ve notated the left hand fingering (right hand players) for all the scale shape / patterns below.
The numbers in the yellow neck diagrams indicate the fingers. The neck diagrams also clearly show what the shape or pattern looks like. Learn to visualize and memorize the shape of each pattern.
1 = index
2 = middle finger
3 = ring finger
4 = pinky
Alternative Picking
Practice the scale shapes using alternative picking. Hold the pick between your thumb and index finger with the pointed end facing toward the strings. Strictly use alternating down and up strokes. The first note you play is a downstroke, the second an upstroke, the third one a downstroke, the fourth one an upstroke and so on.
Key of the Scale
In the examples below we play the A natural minor scale, but it’s the goal to learn these scale shapes/patterns in every key.
Enjoy your practice!
NATURAL MINOR SCALE SHAPES – ROOT NOTE STARTS FROM THE 6TH STRING
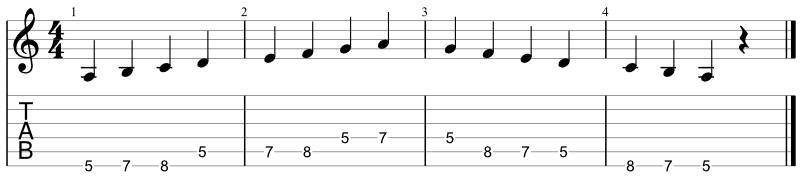
A NATURAL MINOR SCALE SHAPE / PATTERN #1
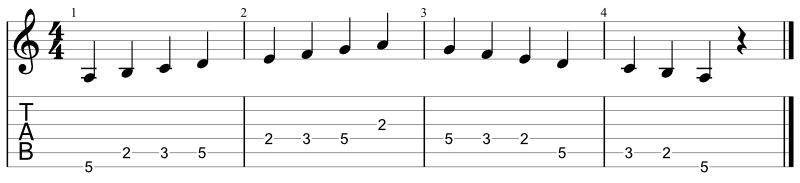

First learn and memorize A natural minor scale pattern #1. Once you got the scale under your fingers learn the pattern in different keys. Move up the entire scale shape 2 frets higher (that means every note of the scale) and play it again. Your first (root) note should now be starting on the 7th fret Low E-string. You are now playing a B natural minor scale. Now play the scale starting with the first (root) note on the 10th fret. You’re playing a D natural minor scale. Practice moving and playing your scale pattern everywhere on the neck.
A NATURAL MINOR SCALE SHAPE / PATTERN #2
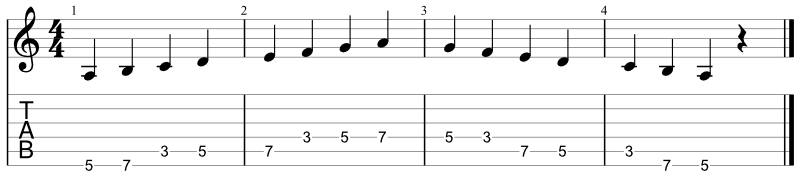

Natural minor scale pattern #2 needs a bit of a stretch, but after some practice it gets easier. I promise. This one is good for developing flexibility, and learning 3-notes-per string licks. Again, when you get this scale under your fingers learn to play it in different keys. Moving the scale pattern higher up the neck makes it easier to play, because the spaces between the frets get smaller.
A NATURAL MINOR SCALE SHAPE / PATTERN #3

Pattern #3 is the most common played natural minor scale pattern, because of the comfortable shape and root position. Learn and memorize the scale shape/pattern and then play it in different keys around the neck.
Assignments:
- Learn to play each scale shape /pattern ascending and descending using alternate picking.
- Don’t rush, make sure each notes sound clean and clear.
- Learn to play the scale shapes in different keys and be sure to know in what key you are playing.
- Play the scale along with a metronome in different tempos.
- Try to create some melody with each scale shape. Experiment with playing notes from the scale in a different order, use rhythm and different note lengths, and pauses. Try to come up with your own melody or play an existing melody you already know. Play around with the notes. It’s such a valuable lesson. Dare to experiment!
Have a great time!
P.S. In the next post (coming soon!) we’re going to learn one-octave Natural Minor scales starting on the A-string. We’re going to master the entire fingerboard. Come on board!
Read More
This article is from an external source and may contain external links not controlled by Empeda Music.